| Figure 3.1: Partial qualifier hierarchy for @Source and @Sink. |
SPARTA! |
SPARTA is a research project at the University of Washington funded by the DARPA Automated Program Analysis for Cybersecurity (APAC) program.
SPARTA aims to detect certain types of malware in Android applications, or to verify that the app contains no such malware. SPARTA’s verification approach is type-checking: the developer states a security property, annotates the source code with type qualifiers that express that security property, then runs a pluggable type-checker [PAC+08, DDE+11] to verify the type qualifiers (and thus to verify that the program satisfies the security property).
You can find the latest version of this manual in the sparta-code version control repository, in directory sparta-code/docs. Alternately, you can find it in a SPARTA release at https://types.cs.washington.edu/sparta/release/, though that may not be as up-to-date.
The SPARTA toolset contains two types of tools: reverse engineering tools to find potentially dangerous code in an Android app, and a tool to statically verify information flow properties.
The reverse engineering tools to find potentially dangerous code can be run on arbitrary unannotated Android source code. Those tools give no guarantees, however; they just direct the analyst’s attention to suspicious locations in the source code.
By contrast, the tools to statically verify information flow require a person to write the information flow properties of the program, primarily as source code annotations. For instance, an object that contains data that came from the camera and is destined for the network would be annotated with
@Source(CAMERA) @Sink(INTERNET)
There are two different scenarios in which the SPARTA tools might be used.
In this case, the analyst merely re-runs the static information flow tool to confirm the vendor’s work. This shows that there are no undesired information flows in the program.
Chapter 4 explains how to use the SPARTA tools for this scenario.
In this case, it is most efficient to first run the reverse engineering tools to detect suspicious code. Those tools might reveal unacceptable code: either malware or code that the vendor should rewrite in a clearer or safer way. If the suspicious code detection tools do not reveal problems so severe that the app should be rejected, then they help to guide the next step. The analyst writes information flow annotations and runs the information flow tool until either the analyst has found a vulnerability or the lack of tool warnings indicates there is no vulnerability.
Chapter 5 explains how to use the SPARTA tools for this scenario.
If you have trouble, please email either sparta@cs.washington.edu (developers mailing list) or sparta-users@cs.washington.edu (users mailing list) and we will try to help.
This chapter describes how to install the SPARTA tools (Section 2.2) and how to prepare an Android App to have the SPARTA tools run on it (Section 2.3).
If using Eclipse, go to Help → Install New Software and install the Android ADT Plugin (https://dl-ssl.google.com/android/eclipse).
hg clone https://dada.cs.washington.edu/hgweb/sparta-codeusing the credentials you have been given.
Then, unpack the archive.
ant jar
ant all-tests
You should see “BUILD SUCCESSFUL” at the end.
This section explains how to set up an Android application for analysis with the SPARTA tools.
$ANDROID_HOME/tools/android update project --path .
</project>.<property environment="env"/>
<dirname property="checkers_dir" file="\$\{env.CHECKERS\}"/>
<basename property="checkers_base" file="\$\{env.CHECKERS\}"/>
<dirname property="sparta-code_dir" file="\$\{env.SPARTA_CODE\}"/>
<basename property="sparta-code_base" file="\$\{env.SPARTA_CODE\}"/>
<import file="\$\{sparta-code_dir\}/\$\{sparta-code_base\}/build.include.xml" optional="true"/>
To use Eclipse to look at and build the code, perform these simple steps:
Most Android apps will rely on an auto-generated R.java file in the /gen directory of the project. This will only be generated if there are no errors in the project. There may be errors in the resources (.../res directory) that could cause R.java to not be generated.
Additionally, if the app depends on an external .jar file (often located in the lib/ directory), it will compile in Eclipse but not with Ant. To fix this, in ant.properties, add “jar.libs.dir=lib” (or wherever the .jar is located).
This chapter describes the Flow Checker, a type-checker that tracks information flow through your program. The Flow Checker does pluggable type-checking of an information flow type system. It is implemented using the Checker Framework. This chapter is logically a chapter of the Checker Framework Manual (http://types.cs.washington.edu/checker-framework/current/checkers-manual.html). Therefore, in order to understand this chapter, you should first read chapters 1–2 of the Checker Framework Manual, and you should at least skim chapters 18–21 (generics through libraries) and 24–25 (FAQ and troubleshooting).
To use the Flow Checker, a programmer must supply two types of information:
When you run the Flow Checker, it verifies that the annotations in the program are consistent with what the program’s code does, and that the annotations are consistent with the flow policy. This gives a guarantee that the program has no information flow beyond what is expressed in the flow policy and type annotations.
After you read this chapter, see Chapter 6 for tips about writing information-flow annotations.
You write the annotation @Source on a variable’s type to indicate what sensitive sources can affect the variable’s value. You write the annotation @Sink to indicate where (part of) the value might be output.
As an example 1, suppose there is a declaration
@Source(LOCATION) @Sink(INTERNET) double latitude;
The @Source(LOCATION) annotation indicates that the value of latitude might have been derived from location information. It does not guarantee that the value came from authentic GPS data, but only sets a bound on where the information might have come from. Similarly, the annotation @Sink(FlowPermission.INTERNET) marks that the string latitude might be output to the network. It is also possible that the data has already been output.
The argument to @Source (and @Sink) is an enum constant, or a set of them to indicate that a value might combine information from multiple sources (or might flow to multiple locations). Source specifies data sources such as phone number, location, etc. Sink specifies sinks, such as files, network, and so on. The types of Source and Sink are listed in the Source.java and Sink.java files in sparta.checkers.quals. Most of them correspond to Android permissions (see http://developer.android.com/reference/android/Manifest.permission.html), and others are new “permissions” that provide finer-grained control over the behavior of an application.
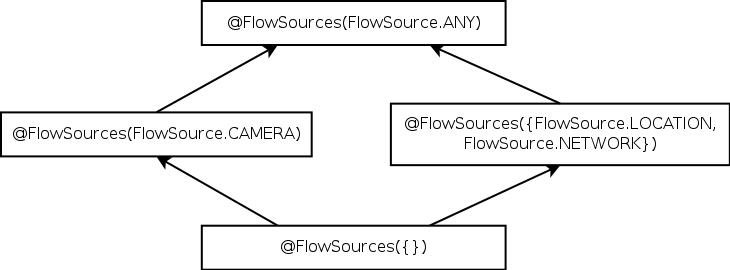
Figure 3.1: Partial qualifier hierarchy for @Source and @Sink.
As with standard Java types, the type annotation hierarchy indicates which assignments, method calls, and overriding are legal. Figure 3.1 shows part of the @Source qualifier hierarchy. The top type is @Source(ANY), which is shorthand for listing every source. It would be legal to annotate every variable in a program with @Source(ANY), because every variable is derived from some subset of all flow sources. But, such an annotation would be imprecise. @Source({}) is the bottom type, and may only be applied to variables whose value does not depend on any sensitive source.
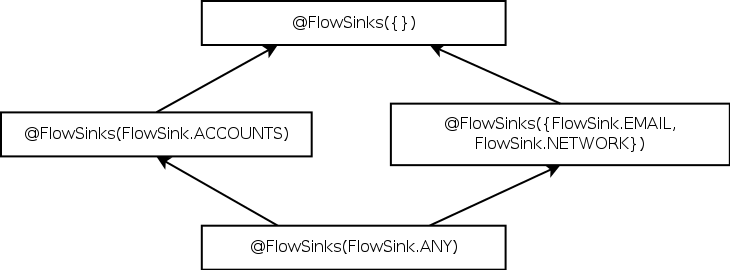
Figure 3.1 shows part of the @Sink qualifier hierarchy. The top type is @Sink({}), which indicates that the value is only used locally by the application and never flows to any sensitive sink. The bottom type, @Sink(Sink.ANY), is a value that might be output to any location whatsoever; it can be thought of as a completely public value.
Note the different subtyping behavior for sources and sinks.
The Flow Checker considers conditional expressions to be a flow sink. If a variable will be used in a conditional, then it must have a flow sink of CONDITIONAL. By default, any source is allowed flow through a conditional. That is to say that ANY → CONDITIONAL is added to the flow policy by default.
Conditionals are treated this way because they can leak information. For example, the given a flow policy of USER_INPUT → FILESYSTEM, the following type checks.
@Source(USER_INPUT) @Sink(FILESYSTEM)
int creditCard = getCCNumber();
final int MAX_CC_NUM = 9999999999999999;
for (int i = 0 ; i < MAX_CC_NUM ; i++){
   if (i == creditCard)
        sendToInternet(i);
}
To catch this sort of information leak, pass -Alint=strict-conditional to change the default from ANY → CONDITIONAL to LITERAL → CONDITIONAL.
Programmers should not use @Source({}) or @Sink({}) for any types except in stub files. These types are only needed for top/bottom types which are used in the default types: the null literal uses the bottom type in order for it to be assignable everywhere; local variables use the top type which will be refined by flow sensitivity. Every value should either flow from a literal or from some sensitive source. Likewise, every value must flow to a sensitive sink or to a conditional expression. Any variable that does not have a flow source or a flow sink does not actually affect the output of the program and should therefore be removed.
This may seem overly strict, but a variable without a flow source or flow sink that does affect the output of the program comes from an abuse of the type system. Most likely a variable with no source or sink would come from an improperly suppressed warning. Therefore it is necessary to not allow flows from and to nowhere. (The flow policy ensures this; see section Section 3.2)
Note that this does not mean you must specify both a flow source annotation and a flow sink annotation as explained in Section 3.3.
A flow policy is a list of all the flows that are permitted to occur in an application. A flow-policy file is a list of ⟨flow source, flow sink⟩ pairs. If a flow is not listed in the flow policy or no flow policy is specified, no flows are allowed except for the conditional flows discussed in section Section 3.1.2.
The Flow Checker guarantees that there is no information flow except for what is explicitly permitted by the policy file. If a user writes a type that is not permitted by the policy file, then the flow checker issues a warning even if all types in program otherwise typecheck.
For example, this variable declaration
@Source(CAMERA) @Sink(INTERNET) Video video = ...
is illegal unless the the policy file contains:
CAMERA -> INTERNET
Here is another example. The flow policy file contains:
  ACCOUNTS      -> EXTERNAL_STORAGE, FILESYSTEM
  ACCELEROMETER -> EXTERNAL_STORAGE, FILESYSTEM, INTERNET
The following variable declarations are permitted:
  @Source(ACCOUNTS) @Sink(EXTERNAL_STORAGE) Account acc = ...
  @Source(ACCELEROMETER, ACCOUNTS)
  @Sink(EXTERNAL_STORAGE, FILE_SYSTEM) int accel = ...
The following definitions would generate “forbidden flow” errors:
  @Source(ACCOUNTS) @Sink(@INTERNET) Account acc = ...
  @Source({ACCELEROMETER, ACCOUNTS})
  @Sink({EXTERNAL_STORAGE, FILESYSTEM, INTERNET})
Each line of a policy file specifies a permitted flow from a source to one or more sinks. For example, MICROPHONE -> INTERNET implies that MICROPHONE data is always allowed to flow to INTERNET. The source or sink must be a member of the enum sparta.checkers.quals.FlowPermission. The source and sink names should not be preceded by the name of the enumeration which contains them. ANY is allowed just as it is in @Source and @Sink, but empty, {}, is not allowed.
Multiple sources or sinks can appear on the same line if they are separated by commas. For example, this policy file:
MICROPHONE -> INTERNET, LOG, DISPLAY
is equivalent to this policy file:
   MICROPHONE -> INTERNET
   MICROPHONE -> LOG
   MICROPHONE -> DISPLAY, INTERNET
The policy file may contain blank lines and comments that begin with a number sign (#) character.
To use a flow-policy file when invoking the Flow Checker from the command line pass it the option:
-AflowPolicy=mypolicyfile
Or if you are using the check-flow ant targets, you can pass the option to ant:
ant -DflowPolicy=mypolicyfile check-flow
Location Default Flow Type @Source(α) @Source(α) @Sink(ω), ω is the set of sinks allowed to flow from all sources in α @Sink(ω) @Source(α) @Sink(ω), α is the set of sources allowed to flow to all sinks in ω Fields @Source(LITERAL) Method parameters @Source(LITERAL) Return values @Source(LITERAL) null @Source({}) @Sink(ANY) Literals @Source(LITERAL) @Sink(CONDITIONAL) Local variables @Source(ANY) @Sink({})
Table 3.1: Default types
To reduce the number of annotations needed, default types are used. Table 3.1 shows the default types used by the flow checker.
The defaults are not applied if the programmer uses annotations. For example, the parameter below is of type @Source(LOCATION) @Sink(INTERNET) rather than @Source(LITERAL).
public void sendToInternet(
    @Source(LOCATION) @Sink(INTERNET) String message){...}
The value null has the bottom type (@Sink(ANY) @Source({})), so that it can be assigned to any type. For local variables, the default applies to the top level of the local variable type, but not to generic type arguments and array elements, if any.
The Checker Framework supports flow-sensitive type refinement. Assignments (such as initializers) are used to refine the type to a more precise one. Thus, in general you do not have to write type annotations on local variables. For details, see section “Automatic type refinement (flow-sensitive type qualifier inference)” in the Checker Framework Manual.
If the programmer specifies only flow sources, the flow sink is defaulted to be the sinks that the all the specified flow sources can flow to. This is to say that it is the intersection of the set of sinks each source can flow to. In other words, if a type is annotated with @Source(α), where α is a set of sources, then the flow sinks are the set ω where ω is the intersection of sinks B where A → B and A is a flow source in α. For example, if the flow policy contains the following:
  A -> X,Y
  B -> Y
  C -> Y
then these are equivalent:
  @Source(A)                 ==   @Source(A) @Sink({X, Y})
  @Source(B)                 ==   @Source(B) @Sink(Y)
  @Source({B,C})             ==   @Source({B,C}) @Sink(Y)
  @Source(A) @Sink(Y)   ==   @Source(A) @Sink(Y)
  @Source({A,B})             ==   @Source({A,B}) @Sink(Y)
Similarly, if the programmer only specifies flow sinks, the flow sources are defaulted to be the sources that are allowed to flow to all the specified sinks. In other words, if a type is annotated with @Sink(ω), where ω is a set of sinks, then the flow sources are the set α where α is the intersection of sources A where A → B and B is a flow sink in ω. For example, using the same policy file as above, the following are equivalent:
  @Sink(X)                   ==   @Source(A) @Sink(X)
  @Sink(Y)                   ==   @Source({A,B,C}) @Sink(Y)
Sometimes it might be necessary to suppress warnings or errors produced by the Flow Checker. This can be done by using the @SuppressWarnings("flow") annotation on a variable, method, or (rarely) class declaration. Because this annotation can be used to subvert the Flow Checker, its use is considered suspicious. Anytime a warning or error is suppressed, you must write a brief comment justifying the suppression. @SuppressWarnings("flow") should only be used if there is no way to annotate the code so that an error or warning does not occur. Most programs should not suppress warnings.
Files in sparta-code/src/sparta/checkers/flowstubfiles provides library annotations. You may need to enhance them, if you find that your application uses APIs that are not yet annotated. For details, see section 5.3.1 of this manual, and also chapter “Annotating Libraries” in the Checker Framework Manual.
Two additional type annotations can be used to annotate polymorphic methods: @PolySource, @PolySink.
To make the type system more expressive, the flow type system supports qualifier polymorphism, via the type qualifiers @PolySource and @PolySink. These are mostly used when annotating APIs when the specific flow sources or flow sinks are not known or can vary. See section “Qualifier polymorphism” in the Checker Framework Manual.
Four additional declaration annotations can be used to annotate APIs: @DefaultFlow, @ConservativeFlow, @PolyFlow, and @PolyFlowReceiver. They change the default annotations (Section 3.3).
The declaration annotations can be used on any declaration: a method, a class, or even a whole package. For example, the whole android package should use conservative defaults. More specific annotations given in the rest of the file override these defaults.
An element annotated with @DefaultFlow expresses that an enclosed method’s return type and all parameter types are @Source(LITERAL) @Sink(CONDITIONAL). As with all library annotations, it is trusted rather than checked. Thus, it should be used only if an external analysis has determined that it is correct for the annotated method, class, or package.
Annotation @ConservativeFlow expresses that each contained method should have the most conservative possible annotations: @Source() @Sink(ANY) on arguments, and @Source(ANY) @Sink() on return values. This is so conservative that it is sure to cause a type-checking failure whenever the method is used. When the analyst encounters such type-checking errors, the analyst can annotate the methods more appropriately. This is a way of knowing when a program uses a previously-unannotated library.
Annotation @PolyFlow expresses that each contained method should be annotated as @PolySource @PolySink for both the return types and all parameters. It should be used to express a relationship between the parameters and the return types.
Annotation @PolyFlowReceiver expresses that each contained method should be annotated as @PolyFlowPermission @PolyFlowPermission for the return type, all parameters types and the receiver type.
By default, the flow checker is unsound. After getting the basic checks to pass, the stricter checks should be enabled, by running ant -Dsound=true check-flow. This two-phase approach was chosen to reduce the annotation effortand to give two separate phases of the annotation effort. The sound checking enforces invariant array subtyping and type safety in downcasts.
When strict checks are turned on, a cast (Object []) x, were x is of type Object, will result in a compiler warning:
[jsr308.javac] ... warning: "@Sink @Source(ANY) Object"
       may not be casted to the type "@Sink @Source Object"
The reason is that there is not way for the type-checker to verify the component type of the array. There is no static knowledge about the actual runtime values in the array and important flow could be hidden. The analyst should argue why the downcast is safe.
Note that the main qualifier of a cast is automatically flow-refined by the cast expression.
Stricter checking also enforces invariant array subtyping, which is needed for sound array behavior in the absence of runtime checks. Flow inference automatically refines the type of array creation expressions depending on the left-hand side.
Enabling stricter checking will also enable the -Alint=strict-conditional option to limit allowed sinks to conditionals. See Section 3.1.2 for more details.
Some methods that are intended to be overridden by subclasses, such as Object’s equals() and toString(), are given the most general possible return type, @Source(ANY) @Sink(). This permits overriding methods to give them a more specific return type, which might depend on fields of the overriding class as well as on the types of the arguments. In fact, an overriding method must give a more specific return type, since @Sink prevents the value from being used.
Most binary operations, such as string concatenation and integer addition, produce a result whose type is the least upper bound of the two operand types.
If you are presented with an annotated app, you can confirm the work of the person who did the annotation by answering affirmatively three questions.
Run the Flow Checker (Chapter 3) to ensure that there is no data flow in the application beyond what is expressed in the given flow policy:
ant -DflowPolicy=myflowpolicy check-flow
If the Flow Checker produces any errors or warnings, then the app has not been properly annotated and should be rejected.
Does the flow-policy file match the application description? There should not be any flows that are not explained in the description. These flows may be explicitly stated, such as “encrypt and sign messages, send them via your preferred email app.” Or a flow may only be implied, such as “This Application allows the user to share pics with their contacts.” In the first example, you would expect an EMAIL sink to appear somewhere in the policy file. In the second, “share” could mean a you would see a Flow Sink of EMAIL, SMS, INTERNET, or something else. Flows that are only implied in the description could be grounds for rejection if the description is too vague.
Does the justification for every @SuppressWarnings make sense? Search for every instance of @SuppressWarnings("flow") and read the justification comment. Compare the justification to the actual code and determine if it make sense and should be allowed. No justification comment could be grounds for rejection.
If you are presented with an unannotated app and wish to confirm that it contains no malware, then you need to perform three tasks:
More specifically, the recommended workflow is:
Write a flow-policy file. Section 3.2 describes flow policies.
Read the App description and user documentation, looking for clues about the permissions , sensitive sources, and sinks and how information flows between them. For example, if this is a map app, does the description say anything about sending your location data over the network? If so, then you should add LOCATION→INTERNET to the flow-policy file. Where else does the description say LOCATION data can go?
Theoretically, you should be able to write a complete Flow Policy from the description if the description is well-written and the app does not contain malware. In practice, you will have to add flows to the policy file as you more fully annotate the app, but you should ensure that they are reasonable and make note of what additional flows you had to add.
Look at the AndroidManifest.xml file and:
(If you are short on time, you could start with reading the manifest file rather than first reading the app description as recommended in Section 5.1.1. But determining the permissions from the documentation will be more effective in finding problems in either the documentation or the code.)
(Permissions are not one-to-one with sinks and sources, but the name of the permission should give a clue about which sources and sinks are involved.) For example, if the SEND_SMS permission is requested, then SMS should be listed as a flow sink somewhere in the policy file. If this is not the case, do not add it to the policy file, but pay close attention to how this permission is used in the code.
Run
ant reportsuspicious
to get a list of the most suspicious code locations. The code may be innocuous, but a human should examine it.
This target reports
The file sparta-code/src/sparta/checkers/suspicious.astub contains the classes and methods that are considered suspicious.
The following example from the suspicious.astub file reports all calls
of the invoke method and, additionally, all constructor calls
of the class java.util.Random:
package java.lang.reflect;
class Method {
    @ReportCall
    public Object invoke(Object obj, Object [] objs) {}
}

package java.util;
@ReportCreation
class Random {}
.java and strings.xml files. The searched-for patterns
appear in the script sparta-code/suspicious.pl.If you learn of additional suspicious API uses or String patterns, please inform the SPARTA developers so they can add them to the suspicious.astub or suspicious.pl file.
Run
ant reqperms
to see where the application calls API methods that may require some Android permissions. The ant reqperms tool will help you gain an understanding of how your app first obtains information from a sensitive source, or how your app finally sends information to a sensitive sink. This may help you decide what parts of the app to further investigate, or where to start your annotation work. For example, you will see error messages like:
MainActivity.java:35:
error: Call could additionally require permission(s) [android.permission.SET_WALLPAPER],
but caller only provides []!
   clearWallpaper();
                 ^
You can eliminate the error by writing @RequiredPermissions(android.Manifest.permission.PERMISSION) in front of the method header in the source code, if you would like to propagate the required permission up the call stack. However, it is not necessary to eliminate all the errors from RequiredPermissions. The reqperms tool is only a tool to guide your annotation and manual analysis effort.
Any permission that is required should already be listed in the AndroidManifest.xml file.
The permissions required by the Android API appear in file src/sparta/checkers/permission.astub, expressed as @RequiredPermissions annotations.
Run
ant reportapiusage
to get a report of Android and other APIs used in the application. These APIs are not suspicious in general (see 5.2.1 for reports about suspicious API use). However, they do help the analyst to better understand the structure of the code not just with respect to its standard module structure, but in terms of how it interacts with Android interfaces.
The ant reportapiusage target only reports about APIs that appear in the file: sparta-code/src/sparta/checkers/apiusage.astub. Additional .astub files can be passed using the -Astubs=... argument in the build file.
The following example from apiusage.astub causes ant reportapiusage
to report the use of all entities in the package
com.android:
@ReportUse
package com.android;
As you work, enhance the apiusage.astub to add the entities that are most crucial to understand the behavior of an application. Contact the SPARTA developers to tell them of additions that should appear in the file.
It is most effective to write information flow annotations from the bottom up: first annotate libraries your code uses, then your packages and classes that use those libraries, and so forth up to the entry points of your application. Section 5.3.1 describes how to annotate libraries, and the remainder of this section describes how to annotate your own code.
When the Flow Checker type-checks your code that calls a library API, the Flow Checker needs to know the effect of that call. Stub files in sparta-code/src/sparta/checkers/flowstubfiles/ provide that information. You may need to enhance those stub files, if they do not yet contain information about the library APIs that your application uses. (Over time, the stub files will become more complete, and you will have to do less work in this step for each new app.)
For every API method used by this app (including all those output by ant reportapiusage), do the following:
If the method does is not directly related to information flow (its inputs and outputs could be anything and are not required to have a specific @Source annotation), then annotate its parameters and return type with @PolySource @PloySink, which essentially says that the output can have all the flow sources and sinks of the inputs.
Important: After changing or adding stub files, run ant jar to rebuild sparta.jar.
The stub files can include any third-party library that is not compiled along with your application. You can add a new .astub file to the flowstubfiles/ directory. Alternately, you can put a new .astub file elsewhere and then pass this file to the ant check-flow target:
ant -Dstubs=path/myAnnoLib.astub check-flow
Here is an example from a stub file:
package android.telephony;

class TelephonyManager {
    public @Source(FlowPermission.PHONE_NUMBER) String getLine1Number();
    public @Source(FlowPermission.IMEI) String getDeviceId();
}
The above annotates two methods in class TelephonyManager. It indicates that the getLine1Number function returns a String that is a phone number. For more examples, look into the stub files. Also, see the “Annotating Libraries” chapter in the Checker Framework Manual.
When creating a new stub file, see the section “Creating a stub file” in the Checker Framework Manual to learn how to create an initial file and prevent a great deal of repetitive cut-and-paste editing.
It is usually a good idea to annotate an entire API class at a time, rather than to just annotate the specific methods that your app uses. Annotating an entire class lets you think about it once, which takes less time in the long run. It also reduces confusion for people who will later wonder whether a particular method was intended to be unannotated or had not yet been annotated.
Note: at the end of this step, you have not yet added any annotations to the app itself, only to libraries.
Write information flow annotations for your application, in the same way as you did for the libraries. Read the documentation, decide on the types, and write those. A fast and effective way to do this is to grep the source code for words related to information flow properties, such as “camera” or “network”. These words might appear in documentation or in source code. Wherever the words appear, you may be able to write information flow type qualifiers. This approach is both faster and less error-prone than iteratively running the type-checker and fixing the errors that it reports one-by-one.
Focus on the most interesting flow sources and try to connect the flow sources and sinks in the application. Instead of trying to completely annotate only the sources or only the sinks, skim over all the reports and use your intuition to decide which parts of the application to focus on. Try to focus on the parts with the (most) connections between sources and sinks.
Most types will only use either a Source(…)or Sink(…)annotation. The goal is to find places where you need both annotations, e.g. to express that information that comes from the camera may go to the network:
    @Source(CAMERA)
    @Sink(INTERNET) Picture data;
Such a type connects sources and sinks and one needs to carefully decide whether this is a desired information flow or not.
Once you have written as many type qualifiers as possible, proceed to type-checking (Section 5.3.3).
Run
ant check-flow
Eliminate each warning in one of two ways.
An example is a String literal that should be allowed to be sent over the network. By default, every literal has @Sink(CONDITIONAL) and @Source(LITERAL).
    @SuppressWarnings("flow") // manually verified to not contain secret data
    @Sink(INTERNET) String url = "http://bazinga.com/";
Without warning suppression the assignment raises an error, because string literals have a default annotation of Source(LITERAL). By adding the suppression, you assert that it’s OK to send this string to the network.
After you have corrected some of the errors, re-run ant check-flow. Repeat the process until there are no more errors, or until you find bad code (malicious, or buggy and prone to abuse).
Once all warnings were resolved, run
ant -Dsound=true check-flow
Providing the sound option enables additional checks that are required for soundness, but would be disruptive to enable initially. In particular, the tests for casts and array subtyping are stricter. See the discussion in Chapter 3.
This option will also use the stricter conditional rule. (LITERAL → CONDITIONAL rather than the relaxed ANY → CONDITIONAL)
This chapter contains tips for annotating an Android application.
In general, only fields and methods signatures in your own code and in libraries need to be annotated. Usually method bodies do not need to be annotated.
Typically, return types should be annotated with just Source so that the Sink can be inferred from the policy file as explained in Section 3.3. Similarly, parameters should only be annotated with Sink, so that the Source can be inferred from the policy file. Local variables should not have to be annotated, because their types can be inferred. Fields must be annotated with Sink or Source, or sometimes both.
If you read the Javadoc and the method returns an object from a certain source, then you should annotate the return type with that flow source and with @Sink(FlowPermission.ANY). (If @Sink is omitted, then it is assumed to be empty which means that the object returned cannot be assigned to a variable with a sink.)
The getParameters method is an example of a method that returns an object with a source.
package android.hardware;
class Camera {
    @Source(FlowPermission.CAMERA_SETTINGS) @Sink(FlowPermission.ANY)
        Camera.Parameters getParameters ();
    void setParameters (@Source(FlowPermission.ANY) @Sink(CAMERA_SETTINGS)
         Camera.Parameters params);
}
Camera.Parameters parameters
     = mCamera.getParameters();
// Change some parameters
// If the policy file contains: CAMERA_SETTINGS->CAMERA_SETTINGS
// Then the following statement will not give an error:
mCamera.setParameters(parameters);
If you read the Javadoc for an API method an it sends some parameters to a FlowPermission, then the parameters should be annotated with that flow sink and ANY flow source.
Example annotation
package android.database.sqlite;
class SQLiteDatabase{
  public void execSQL (@Sink(FlowPermission.DATABASE) @Source(FlowPermission.ANY) String sql);
}
Use of the API
@Source(SMS,LITERAL)  String getSMSQuery(){..}
String mes = getSMSQuery();
//if SMS,LITERAL->DATABASE is in flow policy
//Then the following statement will not give an error
db.execSQL(mes);
The Android API frequently uses callbacks. These are methods that the developer must implement and register. In stub files, these callbacks should be annotated with source information and FlowPermission.ANY.
An example annotation of a callback method
package android.hardware;
class Camera$PictureCallback{
  //data: a byte array of the picture data
   void onPictureTaken
      (@Source(FlowPermission.CAMERA) @Sink(FlowPermission.ANY) byte[] data,
             @Source(FlowPermission.CAMERA) @Sink(FlowPermission.ANY)  Camera camera);
}
An example implementation of a callback
public void onPictureTaken
(@Source(FlowPermission.CAMERA) byte[] data, @Source(FlowPermission.CAMERA) Camera camera){
   //If CAMERA->FILE_SYSTEM is in policy file
   //Then the following statement will not give an error
    writeToFile(data);
}
Some methods take the arguments passed, transform them, and then return them. These sorts of methods should be annotated with @PolySource @PloySink to preserve the flow information. The declaration annotation @PolyFlow can be used instead of annotating all the parameters and return types. See Section 3.7.3 for more information
Math.min(...) is a good example of these kinds of methods.
package java.lang;
class Math{
   @PolyFlow
   int min(int i1, int i2);
}
Example use of @PolyFlow.
@Source(FlowPermission.LOCATION) int i1 = getLocation();
@Source(FlowPermission.INTERNET) int i2 = getLocationForNetwork();
@Source({FlowPermission.LOCATION,FlowPermission.INTERNET)}) int min = Math.min(i1,i2);
This section explains some common errors issued by the Flow Checker, and gives advice about correcting the errors.
Also see the Checker Framework Manual (http://types.cs.washington.edu/checker-framework/current/checkers-manual.html), which contains information about pluggable type-checking in general. Many of your errors may not be specific to the Flow Checker and are likely to be answered in the Checker Framework Manual.
If you encounter a problem you cannot solve, contact the SPARTA developers (Section 1.2).
Every source-sink pair in your code must be listed in the flow policy or else a forbidden flow error will occur. To correct a forbidden flow error, add the forbidden flow to the policy file.
For example, fix the error below by adding LITERAL -> FILESYSTEM to the policy file.
NewTest.java:43: error: flow forbidden by flow-policy
        test = new @Sink(FlowPermission.FILESYSTEM)@Source(FlowPermission.LITERAL) TestClass2(fs);
                  ^
  found: @Sink(FlowPermission.FILESYSTEM) @Source(FlowPermission.LITERAL) TestClass2
  forbidden flows:
    LITERAL -> FILESYSTEM
The most common errors are incompatible types. They can be in arguments, assignment, return, etc.
APIs that have not been annotated have been typed so conservatively that they will always produce incompatible types errors where the required is @Sink(ANY) @Source() or @Sink() @Source(ANY). These errors can be fixed by annotating the API method; Section 5.3.1 explains how to annotate APIs. Below is an example of this sort of error.
HelloWorld.java:84: error: incompatible types in argument
                 .replace(R.id.container, fragment)
                                          ^
   found   : @Sink(CONDITIONAL) @Source(LITERAL) Fragment
   required: @Sink(ANY) @Source({}) Fragment
If the incompatible types error is not from conservative defaulting, then the error must be fixed by adding or removing annotations in the application. For example, the error below can be fixed by adding ACCELEROMETER to the FlowPermission of the return type.
HelloWorld.java:49: error: incompatible types in return.
       return x;
              ^
   found   : @Sink(CONDITIONAL) @Source({LITERAL, ACCELEROMETER}) int
   required: @Sink(CONDITIONAL) @Source(LITERAL) int
As explained in Section 3.1.2, any item in a conditional statement must have CONDITIONAL listed as a FlowPermission. If a variable is only annotated with Source and strict conditionals are not used, then CONDITIONAL is added as a flow sink by default.
For example, if input is a parameter in a method and is annotated with @Sink(FlowPermission.INTERNET), the following error will occur. To fix the error, add CONDITIONAL to the flow sink annotation.
HelloWorld.java:48: error: Conditions are not allowed to depend on flow information.
         if(i1 > 2){
            ^
The goal of an application developer is to create a safe, functional application — and to write the documentation and code so that the safety and functionality are immediately obvious. In particular, the code and documentation should be clear and complete, and the system should pass all the tests that the SPARTA toolset performs. If the application developer fails to meet any of these objectives, then the application will be rejected from the app store, and the fault will be with the application developer, not with the app store.
A malicious developer would need to write clear documentation and code, but would attempt to hide malicious behavior in the app nonetheless. If the documentation or code is not clear, or if the malicious behavior is not well-hidden, or if the SPARTA tools do not confirm that the code conforms to the documentation, then the malicious developer has failed in his task.
Note that the malicious developer’s goal is more difficult than just writing malicious code, and is even more difficult than writing well-hidden malicious code. The reason is that the SPARTA toolset encourages good coding style: poor style requires more warning suppressions. The SPARTA tools lead a programmer to better, clearer code.
Here are some specific requirements of the app developer:
Provide source code. Provide a build file (for Ant, Maven, Android, etc.).
The English description should include how the information flows between parts of the application (the paths along which information flows), and the conditions under which it flows (such as only after a particular user action or external trigger). These will eventually be represented in the SPARTA toolset’s file format and checked by SPARTA, but they are not yet.
If rewriting the code is impossible, then every remaining warning should be suppressed with a @SuppressWarnings annotation. Every @SuppressWarnings annotation requires a clear, compelling justification regarding why the code is actually correct and safe (even though the type-checker cannot prove this property), and why the code cannot be rewritten to address the warning. This justification should be written in the source code at the location of the @SuppressWarnings annotation.
An excessive number of type-checker warnings, or missing justifications for warning suppressions, is grounds for rejection from the app store.
This document contains details that are only relevant for people inside the SPARTA team at UW.
The SPARTA team uses four Mercurial repositories: sparta-code for the source code of the SPARTA toolset, sparta-subjects for test applications (case studies), sparta-meetings for notes about UW team meetings, and apac-meetings for notes about DARPA meetings.
To get a copy do:
hg clone https://dada.cs.washington.edu/hgweb/sparta-code
and similarly for the other three repositories.
To push your changes to the repository you need to be in the sparta Unix group. Contact Werner or Mike to get the permission. Also, if you are going to push changes, please add a .hgrc file to your home directory on the server. The .hgrc file should contain:
[trusted]
users = wmdietl
groups = sparta
This allows emails to be sent when you push changes.
Note that SPARTA as well as the Checker Framework are evolving rapidly. Thus you should periodically get the latest version of the source code (by running hg fetch) and rebuild the projects.
After installing your copy, try to run ant in sparta-subjects/Sky:
$ ant check-flow
If it gives results like this, you’re ready to work on annotating!
[jsr308.javac] .../sparta-subjects/Sky/src/org/jsharkey/sky/WebserviceHelper.java:308: error: incompatible types.
[jsr308.javac]             HttpGet request = new HttpGet(String.format(WEBSERVICE_URL, lat, lon, days));
[jsr308.javac]                                                        ^
[jsr308.javac]   found   : @Sink @Source String
[jsr308.javac]   required: @sparta.checkers.quals.Sink(sparta.checkers.quals.FlowPermission.INTERNET) @Source String
If you want to add a new application, put it under the sparta-subjects directory.
You may need to get Android source code to get sense of what API returns (or gets) what type of data. See http://source.android.com/source/index.html You can find the list of all APIs from the Android source code in frameworks/base/api/15.txt - api list for api version 15 (Android 4.0.3) Accessing resource is closely related to Android permissions (some of the resources are not protected with permissions though). The Android permission list is at: http://developer.android.com/reference/android/Manifest.permission.html. Hints to add annotations could be permissionmap (which permission is required to call which functions): http://www.android-permissions.org/permissionmap.html.