Getting Started
This page walks you through a simple example to show how to use a type checker in the Eclipse plugin. It shows how the Nullness Checker can be used to prevent null pointer exceptions.
Outline
1. Import checker-framework-tutorial
If you have not already, download the Eclipse projects. Begin by importing the checker-framework-tutorial project into your Eclipse workspace. Select from the menu, File->Import->Existing Project, then browse to the eclipse-projects/checker-framework-tutorial directory.
Open NullnessExample.java. It is a simple Java program with an obvious null pointer exception.
public class NullnessExample {
    public static void main(String[] args) {
        Object myObject = null;
        System.out.println(myObject.toString());
    }
}
2. Run the Nullness Checker
Run the Nullness Checker to see how it can warn you about this error, before you run the program.
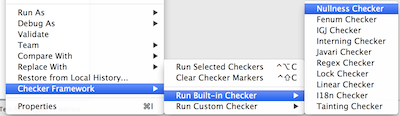
- Right-click on NullnessExample.java.
- Open the "Checker Framework" sub-menu.
- Open the "Run Built-In Checker" sub-menu.
- Select "Nullness Checker".
The following error with be produced.
dereference of possibly-null reference myObject
        System.out.println(myObject.toString());
3. Correct the Code
Change myObject to some non-null value.
public class NullnessExample {
    public static void main(String[] args) {
        Object myObject = new Object();
        System.out.println(myObject.toString());
    }
}
4. Re-run the checker
Re-run the checker. No errors should be produced.
This was a very simple example to show how to use the Checker Framework in Eclipse. The next example is a little more complex.